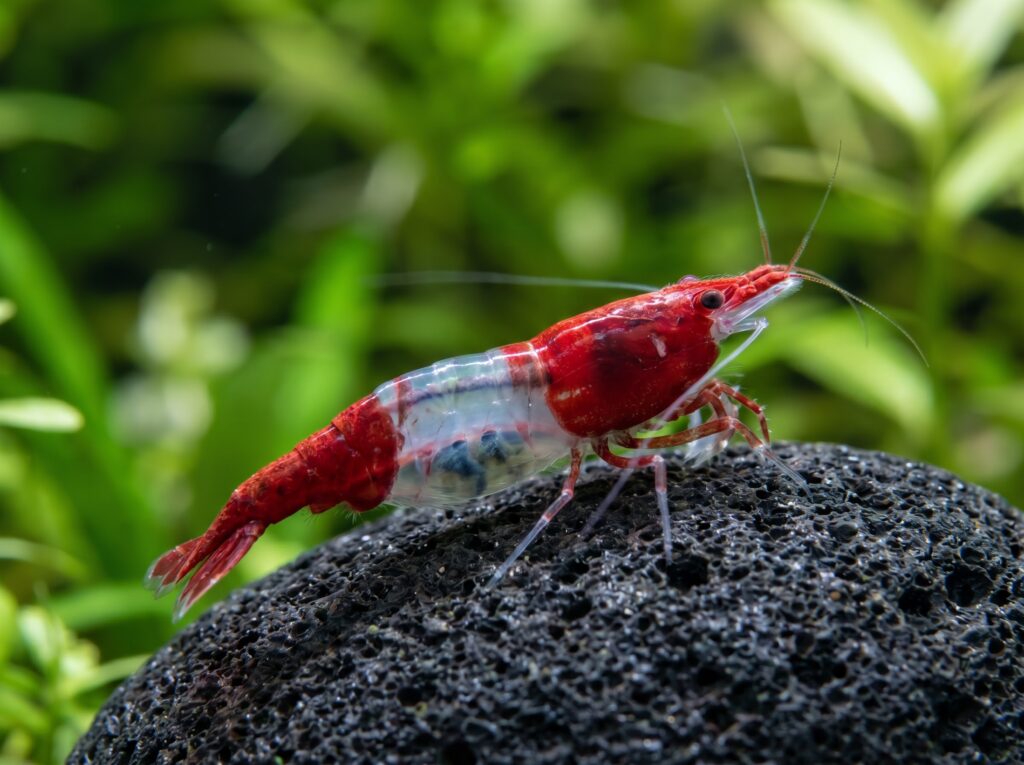
Look at a high-grade Red Rili under good light and the pattern stops you cold: deep cherry-red on the head, deep cherry-red on the tail, and a strip of clear body in between so transparent you can watch the heart beat. That window of transparency is the whole point. The rili pattern is not a separate species or even a separate mutation stacked on top of Cherry Shrimp genetics - it is the same Neocaridina davidi pool, with pigment expressing in the front and rear segments of the body while the mid-section stays nearly free of it. Understanding why the window appears, why it shifts, and what it takes to keep it crisp across generations is what this article is about.
What "rili" actually means
Every Neocaridina davidi color morph traces back to the same wild-type animal: a mottled, brownish shrimp from rivers, ponds, and streams in Taiwan and northern China. Decades of selective breeding pushed pigment into different directions - solid red, solid blue, yellow, and eventually the rili pattern, which breeders isolated and stabilized sometime around 2010. The name "rili" describes the broken-pattern look: colored at both ends, clear in the middle.
The coloring itself comes from chromatophores, which are specialized pigment cells in the shrimp's cuticle. According to the Wikipedia article on Neocaridina davidi (drawing on Flores and Chien's primary research), the species carries at least five chromatophore types: erythrophores and xanthophores (producing red and yellow via carotenoids), iridophores (blue, via structural light interference), leucophores (white), and melanophores (black/brown via melanin). A separate study published in Animals (Basel) confirmed that color shifts occur through two mechanisms: physiological change (redistribution of chromatophores, within minutes) and morphological change (increase or decrease in pigment amount, which takes days to weeks). In the rili pattern, the mid-body region has far fewer active erythrophores and xanthophores than the head or tail segments, leaving the cuticle optically clear there.
One important constraint: shrimp cannot manufacture carotenoid pigments inside their own bodies. A 2024 study in PLOS ONE confirmed that "crustaceans, including ornamental shrimps, cannot synthesize carotenoids endogenously" and must obtain them through diet. Feed a rili on plain flake and the red zones fade. Feed a diet rich in astaxanthin, spirulina, and spinach and the color saturates back. The transparent zone stays transparent regardless - that is determined by where chromatophores develop, not by how much pigment is available.
A 2026 study in BioTech (Basel) identified the NinaB-like gene as a negative regulator of carotenoid accumulation in cherry-type shrimp: "NinaB-like RNAi knockdown resulted in a marked increase in red pigment deposition." In practical terms this means color intensity in the head and tail zones is partly heritable, not just a feeding outcome - a shrimp from high-intensity breeding stock will tend to hold richer color than one from a poorly selected line, even on an identical diet. This does not mean breeders can manipulate that gene directly, but it reinforces why selective breeding from the most vividly colored parents matters.
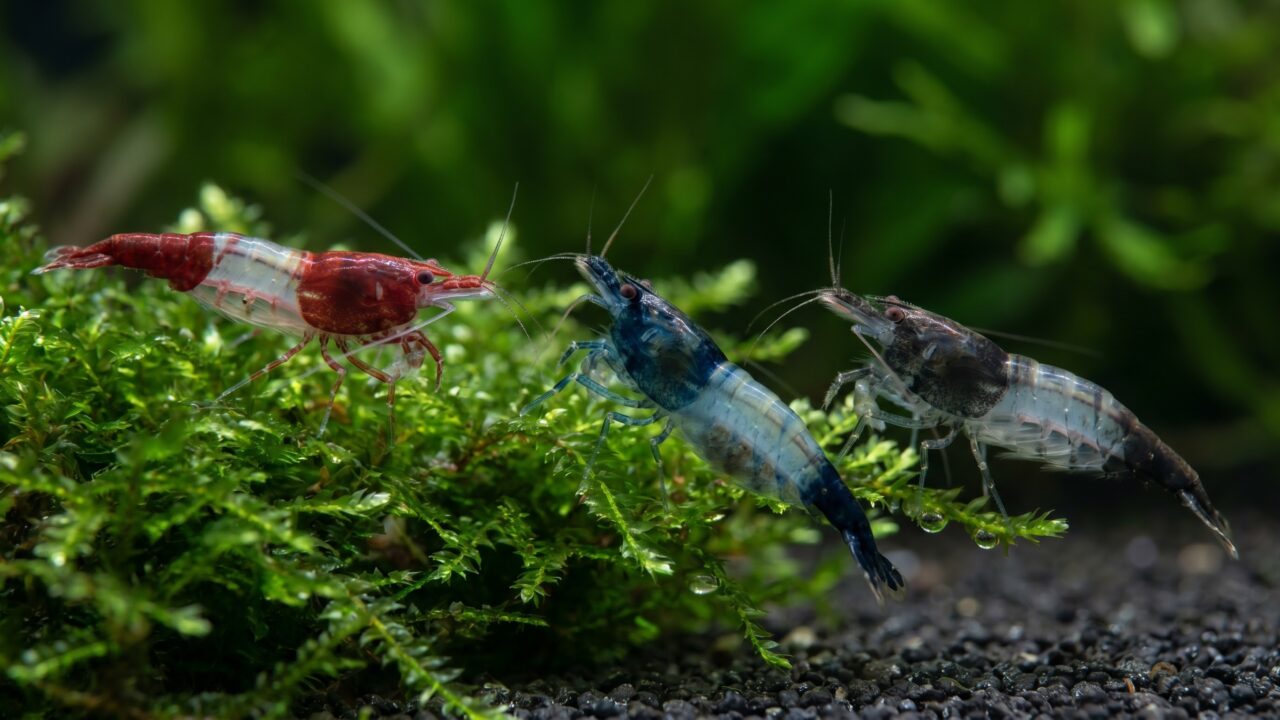
Red, Blue, and Carbon Rili: a pattern comparison
The three most common rili variants sold in the hobby all share the same two-tone body plan. The base color in each zone is what distinguishes them.
| Variant | Head and tail color | Mid-body | Genetic origin | Grade stability |
|---|---|---|---|---|
| Red Rili | Cherry to deep red (depends on grade) | Clear to very pale pink | Cherry Shrimp line; selectively bred from red Sakura stock | Moderate - frequent solid-red or clear throwbacks |
| Blue Rili | Blue to blue-black | Clear to pale blue-grey | Black/Blue line; related to Blue Dream and Blue Velvet ancestry | Moderate - can throw blue-black solids or near-clear |
| Carbon Rili | Near-black to charcoal, sometimes blue-flecked | Clear to very pale | Black Sakura line; darkest of the three | Lower - pattern expression varies more widely |
All three are Neocaridina davidi, all three share identical care requirements, and all three will breed freely with each other - and with Cherry Shrimp, Blue Dream, Yellow Shrimp, or any other Neocaridina color line in your tank. Keeping them separate is not optional if pattern fidelity matters to you.
A note for readers who arrive searching for the mosura or panda pattern: rili is a Neocaridina davidi pattern. The superficially similar mosura pattern in Caridina shrimp (such as Crystal Red or Taiwan Bee variants) is unrelated, and those shrimp require distinctly different water chemistry - soft, acidic, warm - compared to the moderately hard, neutral water Neocaridina thrive in. The visual similarity is coincidence of evolution, not shared genetics.
For a broader look at how all Neocaridina color lines relate to each other, see our Neocaridina shrimp guide.
Why the rili pattern does not breed true
This is the question most keepers ask after their first spawn. They started with 10 rili shrimp, the tank filled up with babies, and now half the colony looks like plain Cherry Shrimp and a quarter look nearly transparent. Where did the pattern go?
The short answer: the rili pattern is polygenic (influenced by multiple genes) and its expression varies with how gene combinations fall across each clutch. Breeders working with Red Rili report that crossing a "Blue Jelly" (a near-clear variant used as a genetic tool) with Red Sakura theoretically produces close to 100% F1 Red Rili offspring - but that is a controlled cross, not what happens in a mixed colony tank. In a general population, the colored-zone genes and the transparency genes assort independently enough that each spawn produces a spread: some offspring with a clear rili pattern, some with reduced or shifted windows, some fully colored, and some nearly transparent all over.
There is no quick fix for this. Selective breeding is the only path to a stable rili colony. That means culling - removing or rehoming offspring that express as solid or near-clear - and only breeding from animals with the most defined pattern. When selecting breeders, prioritize edge definition first (the sharpness of the boundary between the colored segments and the clear zone), color intensity in the solid zones second, and window proportion third. A shrimp with a sharp edge and a medium-width window reliably produces better offspring than one with a wide window and a blurred, gradient border. It takes several generations of consistent selection to tighten the ratio. For guidance on how that process works in practice, our culling shrimp for color article covers the method step by step.
A subtlety worth knowing: a shrimp that looks fully red can still carry the rili pattern gene silently. If you sell or rehome solid-looking offspring from a rili colony without noting their origin, the buyer may be surprised when rili-patterned young appear in their own tank later. This is not a defect - it is how polygenic color genetics work. Our Neocaridina grading guide explains how to assess pattern quality when selecting breeders.
The pattern instability read at a glance
Breeders commonly describe three layers of pattern variation in a rili spawn:
- Window size shifts. The transparent zone can expand to cover most of the body or shrink to a narrow band. Very large windows often look washed-out; very narrow windows read as nearly solid-colored.
- Color intensity in the solid zones. Even among shrimp with a clear pattern, the red (or blue or black) in the head and tail varies from pale to deeply saturated. Low-grade rilis show a translucent tinge rather than solid color in those zones.
- Edge definition. High-grade specimens have a clean, sharp transition between the colored segments and the clear zone. Lower-grade animals show a blurred, gradient boundary - the pattern dissolves rather than stopping cleanly.
Care: same water as Cherry Shrimp, same cautions
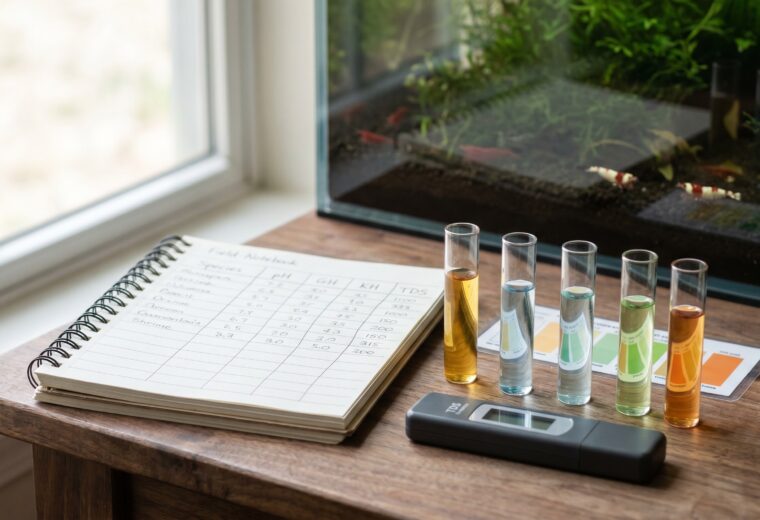
Rili shrimp are no more fragile than standard Cherry Shrimp in daily care. The target parameters are identical across all Neocaridina color lines:
| Parameter | Target range | Notes |
|---|---|---|
| Temperature | 18-26°C (64-79°F) | Breeding slows below 18°C; above 28°C begins to stress the colony; 30°C and above reduces reproductive success |
| pH | 6.5-7.5 | Stable pH matters more than hitting a specific number |
| GH | 6-8 dGH | Calcium and magnesium here fund every molt |
| KH | 1-4 dKH | Buffers pH against swings; very soft tap may need remineralizing |
| TDS | 150-250 ppm | A rough proxy for total mineral content; cross-check GH directly |
| Ammonia | 0 ppm | Any detectable ammonia is dangerous; cycle fully before stocking |
| Nitrite | 0 ppm | Same - zero tolerance before shrimp go in |
| Nitrate | Under 20 ppm | Regular small water changes keep this in check |
SaltyShrimp Shrimp Mineral GH/KH+ is a widely used remineralizer for soft or RO-based tap water. The manufacturer's dosage is approximately 2 g per 10 liters, which targets about 6 dGH and a conductance around 300 µS, with a GH-to-KH ratio of 1.0:0.5. If your tap already hits GH 6-8 and the pH is stable, remineralizing may not be necessary at all.
Chasing a textbook number while allowing weekly swings is worse than holding a slightly imperfect value rock-steady. A rili colony that has lived at GH 7 and pH 7.1 for months is well-adapted to exactly those conditions; the same colony hit with a swing from GH 5 to GH 9 within a single week is under real stress. Keep water changes small (10-15% at a time) and temperature-matched. Our shrimp tank water changes guide has the protocol.
The silent killers to know about
Even small amounts of copper can kill shrimp while leaving fish unaffected. Even trace amounts damage gill tissue - a 2014 study on freshwater Macrobrachium shrimp found acute lethal effects "attributed to excess mucous covering the gill tissues, leading to the breakdown of respiratory function." The three most common copper sources in a home tank are copper-based algae treatments, some liquid fertilizers (check the label for cupric sulfate or copper chelate), and the first draw of water from older copper household plumbing. Run the tap for 30 seconds before filling buckets from old pipes.
Molting failure is the other silent killer. GH supplies the calcium and magnesium shrimp use to rebuild a new shell after shedding the old one. Drop GH below 4 dGH consistently and molts begin to go wrong. The visible sign is the white ring of death, a failure point where the old shell did not release properly during ecdysis, leaving a pale gap encircling the body. By the time you see it, the molt is already lost, and adding a cuttlebone at that point changes nothing. Keeping GH in range prevents it. Sudden large TDS swings can also trigger failed molts, which is another reason to do small, gradual water changes.
Adding new shrimp safely
New arrivals need gradual acclimation, not a quick float-and-pour. Pour the bag contents into a small bucket, then use an airline tube with a loose knot to restrict flow from your tank to roughly one drip per second. Leave it running until the bucket holds at least twice its starting volume, which typically takes 60 to 90 minutes depending on the flow rate. Net the shrimp across and pour the acclimation water down the drain.
This step is especially important when importing rili shrimp that were kept in water with different GH or TDS from your tank. A sudden shift either direction stresses the shrimp immediately and can suppress their immune system for weeks, making them more susceptible to bacterial infections - even if they survive the initial introduction.
Color, diet, and the rili pattern day to day
Because Neocaridina cannot make carotenoid pigments on their own, diet directly affects how saturated the red (or blue, depending on the variant) zones look in your rili shrimp. A varied diet that includes astaxanthin-rich foods - spirulina wafers, blanched spinach, dedicated shrimp foods with astaxanthin listed in the ingredients - keeps the colored segments vivid. This does not affect the pattern shape. A rili that would be light cherry in the head becomes a deeper red with good feeding, but the transparent window stays where it is genetically determined to be.
Color can also appear to fade temporarily after a molt, when the new cuticle has not yet loaded with pigment. This is normal and reverses within a few days. If color loss is persistent and not tied to molting, check GH, diet, and whether the tank is planted enough to provide shaded resting spots - rili shrimp in very bright tanks sometimes pale out to reduce contrast with their surroundings, a vestige of the wild-type camouflage behavior documented in their ancestors.
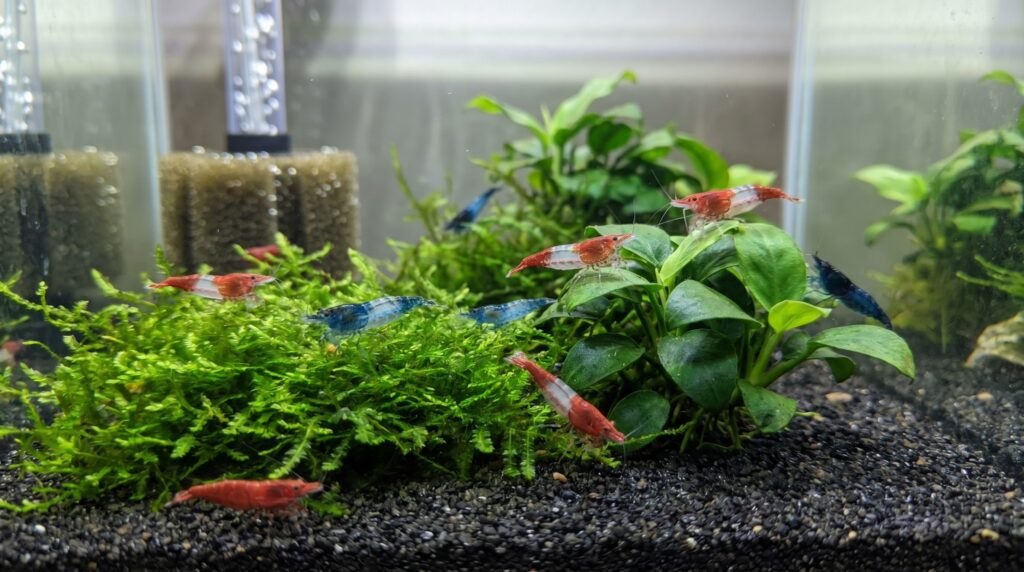
Setting up a rili colony
Start with at least 10 shrimp - preferably 15 to 20 - to give the colony enough genetic diversity to breed without inbreeding depression. A single male-to-female skew is fine; you cannot reliably sex juveniles anyway, so order a mixed group and let the ratios fall naturally. Females are generally a bit larger and develop a visible saddle (the yellow-green patch of unfertilized eggs under the dorsal carapace) when mature. Males are smaller and slimmer.
Tank size can be as small as 10 liters (roughly 2.5 US gallons) for a small colony, but 20-40 liters gives you easier parameter stability and room to grow. A mature, cycled tank is non-negotiable - ammonia and nitrite must both read zero before any shrimp go in. A sponge filter works well; it provides biological filtration without the suction that pulls tiny shrimplets into a HOB intake. Dense planting or a moss mat gives the colony biofilm grazing surface and security.
Keep rili shrimp of a single variant (or no other Neocaridina at all) in the tank if you want to maintain the pattern. One stray Cherry Shrimp from a previous inhabitant is enough to introduce solid-red genes into the population. Within a few generations the clean rili pattern frequency drops visibly. If you are keeping rili purely for display and do not plan to cull or breed selectively, mixing is less of a concern - but expect the colony to drift toward a mix of solid, partial, and wild-type-ish offspring over time.